PowerPoint 2003: Compressing Pictures

Lesson 18: Compressing Pictures

/en/powerpoint2003/customizing-slide-design/content/

Introduction

By the end of this module, you should be able to:

  • Compress a selected picture
  • Compress all pictures in a presentation

Compressing pictures

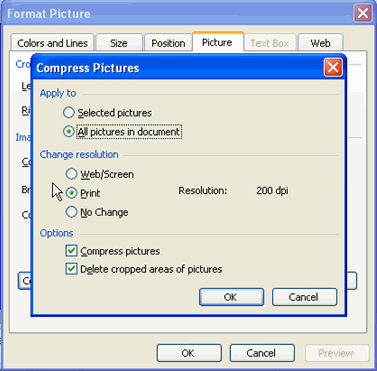
PowerPoint files can be large and take up a lot of space if the presentation contains a lot of images. This can be a problem when you transmit the file via email or save it on a USB drive. To reduce the file size, you can compress the pictures. Compression is the reduction in file size in order to save space or transmission time.

To compress pictures:

  • Right-click the picture.
  • Select Format Picture from the menu. The Format Picture Dialog box will appear.
  • Select the Picture tab.
  • Click the Compress button. The Compress Pictures dialog box will appear.
  • Select Selected pictures or All pictures in document in the Apply to section.
    • If you choose Selected pictures, PowerPoint will compress only the pictures you select.
    • If you choose All pictures in document, PowerPoint will compress all pictures in the presentation.
  • Choose a resolution based on how you will use your presentation: Print, Web/Screen, or No Change.

    Compress Pictures
  • Select Compress Pictures and Delete cropped areas of pictures.
  • Click OK.
  • Click Apply.

Challenge!

  • Open a new blank presentation.
  • Insert at least three pictures into your presentation.
  • Compress all pictures.
  • Close the presentation without saving the file.

/en/powerpoint2003/grouping-and-ungrouping-objects-on-a-slide/content/