Indentation and line spacing are two important elements you can manage in your PowerPoint presentation that can change the way text on a slide appears. When used wisely, both can have a significant impact on the look of your slides.
In this lesson, you will learn how to indent a bulleted list, change the indentation using markers on the ruler, and modify line spacing.
Indentation
Download the example to work along with the video.
PowerPoint gives you the ability to create an indented—or subordinate—list within a list. If you are inserting content that is related to an existing bullet, an indented list can make the text and slide easier to read and more visually appealing to the audience.
To indent a list:
Place the cursor at the beginning of the line of text you want to indent.
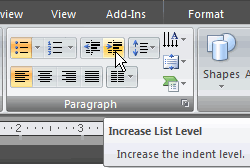
Select the Home tab.
Click the Increase List Level command in the Paragraph group.
The line of text will appear indented.
There are multiple list levels by default in PowerPoint. Each time you click the Increase List Level command, the line is indented more.
If you press Enter while the cursor is on a line of indented text, the new bullet will appear as part of the indented list.
To decrease the indent level of a list:
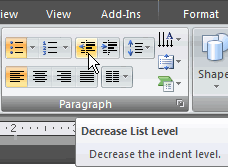
Place the cursor on the line you want to modify.
Select the Home tab.
Click the Decrease List Level command in the Paragraph group. The cursor and line of text will shift to the left one list level.
Indentation
In PowerPoint, you can adjust the space between a bullet in a list and the text. The ability to increase and decrease the indentation gives you control over the lists you use in a presentation, and it allows you to customize them to meet your needs. One of the easiest ways to modify the indentation is by using the indent markers on the ruler.
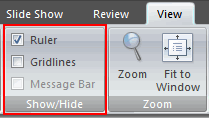
To display the ruler:
Select the View tab.
Click the Ruler check box in the Show/Hide group if it is not selected. The ruler will appear.
To change the position of a bullet or bullets:
Place the cursor on the line with the bullet you want to move. For multiple lines, select the lines of text.
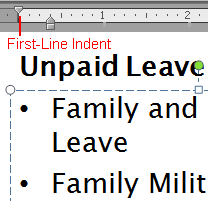
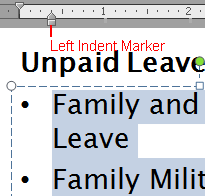
Click and drag the first-line indent marker to change the position of the bullet.
The first-line indent marker looks like an upside-down triangle. It indicates the position of the actual bullet.
Release the mouse button at the desired location.
To change the position of text:
Place the cursor on the line of text you want to move. For multiple lines, select the lines of text.
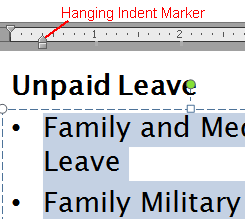
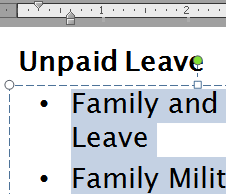
Click and drag the hanging indent marker to change the position of the text.
The hanging indent marker looks like a triangle. It indicates the position of the line of text.
Release the mouse button at the desired location.
To change the position of both bullet and text (while maintaining the spacing):
Place the cursor on the line of text you want to move. For multiple lines, select the lines of text.
Click and drag the left indent marker to change the position of the bullet and text while maintaining the current spacing.
The left indent marker is the rectangle beneath the hanging indent marker.
Release the mouse at the desired location. Both the bullet and text will move but maintain their current proportions.
If you are working with nonbulleted text, such as in a paragraph, you can still use these markers to indent the text. Each marker works the same way but moves slightly different parts of the text.
More about indentation
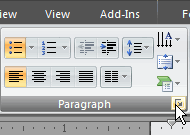
While the ruler is a simple way to modify indentation, you can enter a specific amount to indent using the Paragraph dialog box. To view this dialog box, click the small arrow in the bottom-right corner of the Paragraph group on the Home tab.
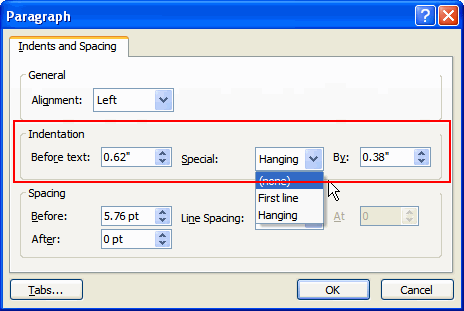
In the Paragraph dialog box, you can enter specific measurements for the indents before the text or special hanging and first-line indents.
Line spacing
In addition to indentation, you can control line spacing. Line spacing is the spacing between sentences and paragraphs in a text box. You can modify line spacing to fit more text onto a slide or to add spacing to specific lines to draw attention to a part of the slide.
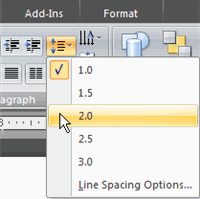
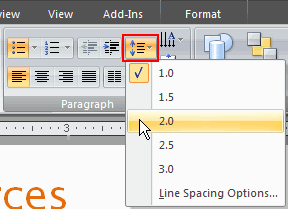
To change line spacing using default options:
Select the lines you want to modify.
Select the Home tab.
Click the Line Spacing command in the Paragraph group. A menu will appear. The menu option with a check mark indicates the line spacing for selected lines.
Select an option from the menu to change the line spacing of the selected lines.
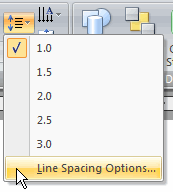
To enter specific line spacing measurements:
Select the lines you want to modify.
Select the Home tab.
Click the Line Spacing command in the Paragraph group. A menu will appear.
Select Line Spacing Options. The Paragraph dialog box will appear.
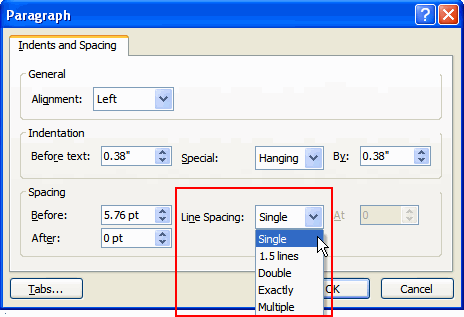
Locate the Spacing section. Use the Line Spacing drop-down menu to:
Select one of the default measurements such as 1, 1.5, and 2.
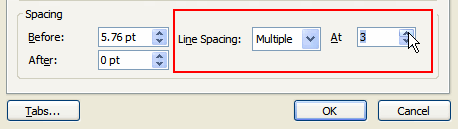
Select Multiple. Enter a number greater than or equal to 3.
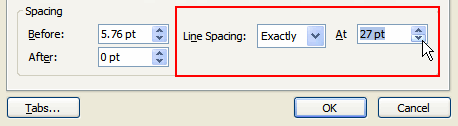
Select Exactly. Enter spacing points in the appropriate field. This is especially useful if you format lines with spacing less than single space.
Click OK.
To change the line spacing before or after a line:
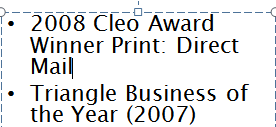
Place the cursor where you want to modify the spacing. In this example, we will increase the spacing after the word Mail.
Select the Home tab.
Click the Line Spacing command in the Paragraph group. A menu will appear.
Select Line Spacing Options. The Paragraph dialog box will appear.
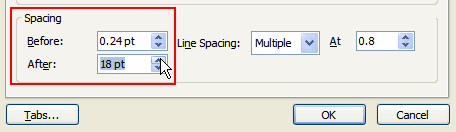
Locate the Spacing section.
Use the arrows in the Before and After fields to increase or decrease the spacing.
The Before option changes the line spacing in the area above the selected text or paragraph.
The After option changes the line spacing in the area below the selected text or paragraph.
Click OK. The change in spacing will appear on the slide.
Challenge!
Use the Employee Orientation presentation or any other presentation you choose to complete this challenge.
Open a presentation.
Locate a slide with a bulleted list. If the presentation does not contain a bulleted list, add one.