Access 2007: Making Forms More Usable with Controls
55e87d2b7a2cbde81af6218755e06fb51496fdb039cef0a2
Lesson 8: Making Forms More Usable with Controls
/en/access2007/creating-and-using-forms/content/
Introduction
You've already seen how a combo box control can make a form more user friendly. In Access 2007, there are several additional ways you can modify forms to make them easier to use while also increasing the integrity of the database. In this lesson, we'll explain how to use form properties to limit the actions your form users can take. We'll also walk you through hiding fields on a form and adding command buttons to the form.
Making forms more usable
Download the example to work along with the video.
Making forms more useable
You already know that forms can help you increase the integrity of your data by limiting what you see and how you can enter data. You saw that using a drop-down list can make data entry easy. Now it's time to think about the design of your forms from a form user's perspective.
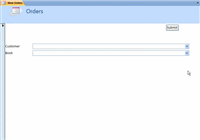
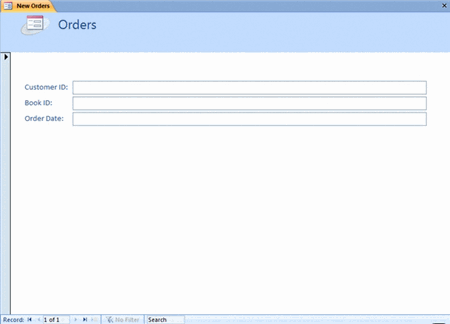
Let's look at the Orders form in our bookstore scenario. The basic form, which was created with the Form command, looks like this:
Orders Form
This form is where we would want our user—the store employee—to pair a customer with a book to complete an order. Let's look at the form from the user's point of view:
The employee would be adding new orders, not editing existing ones, so we'll set form properties to limit this action.
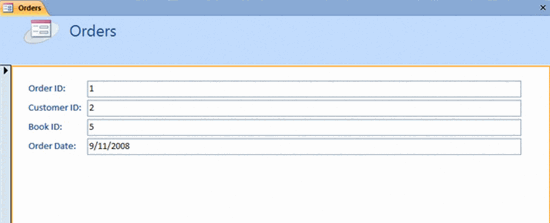
The user will also never need to enter the Order ID number because this is the number the database assigns each order record to differentiate it from other orders. We'll hide this field.
The Customer ID field and the Book ID field are not too useful as they are because the employee would have to know each customer's ID number and every Book ID number to be able to enter the data in the format we need. We'll make these fields more useable by creating combo boxes that help users select the correct customer and book.
Our user will not need to enter the Order Date because we want the database to auto-populate this field in the database using today's date. We'll set field properties to make this happen.
Setting form properties
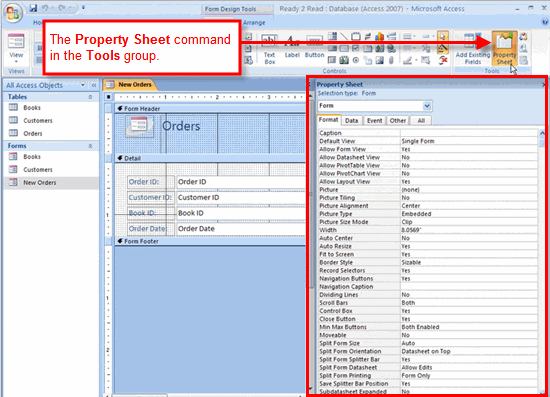
Access 2007 allows you to set several form properties. Form properties are options that are set in Design view on the Property Sheet, like the one shown below. These options control how the form looks, works, and interacts with the rest of the database.
Property Sheet
To set form properties:
View the form in Design view.
Select the Property Sheet command from the Tools group on the Ribbon, as seen above.
Note: The form Property Sheet is also accessible by right-clicking anywhere on the form in Design view and selecting Properties from the menu.
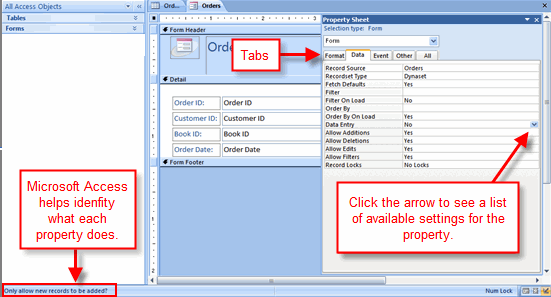
When the property sheet opens:
Make sure Form is selected in the Selection type drop-down list.
Set the desired form properties.
Setting Field Properties with the Property Sheet
Tip: Use the tabs to find the specific property you want to set. Use the help available to you in the bottom-left corner of the Access window to know what each property setting does.
Hiding fields on a form
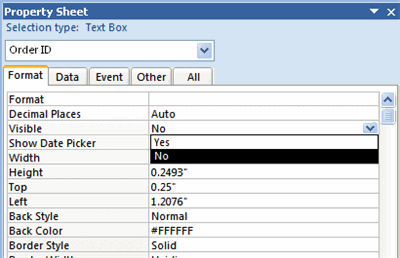
There will be times when a field will not be needed on a form. Access 2007 allows you to hide fields by setting the Visible field property in Design view.
To hide a field on a form:
In Design view, open the Property Sheet.
Change the Visible property setting to No, as seen below.
Visible Property Setting
Switch to Form view to verify that the field is hidden.
Creating combo boxes
For the New Orders form in our bookstore example, we created user-friendly drop-down lists using the Combo Box command. These drop-down lists help our users identify a specific customer and specific book using more useful information than the Customer ID and Book ID numbers, as seen below.
New Orders Form with Drop Down Lists
For more information on creating combo boxes, visit this lesson.
Setting field properties
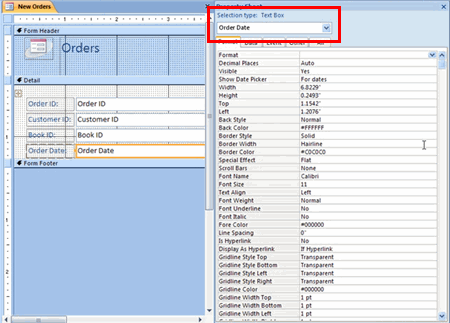
Sometimes it may be necessary to set field properties from the form itself. For example, on the New Orders form for our bookstore shown below, we want to set up the Order Date field to auto-fill with the current date each time an order is entered. This way, our employees will not have to worry about entering a date on the form because the form will do it for them.
New Orders Form
To set field properties from a form in Design view:
Highlight the appropriate field on the form.
Open the Property Sheet.
Verify that the Field Name appears in the Selection type drop-down list.
Set the desired field property.
In our example, we want to set the Order Date field to auto-fill with the current date. Refer to the picture below. Notice that we have the Order Date field highlighted on the form itself. On the Property Sheet, we have Order Date showing in the Selection type drop-down list.
Setting Properties for Order Date on the New Orders Form
Because we want the Order Date to auto-fill, we must set the default value to always enter the current date.
To set a field to auto-fill with the current date:
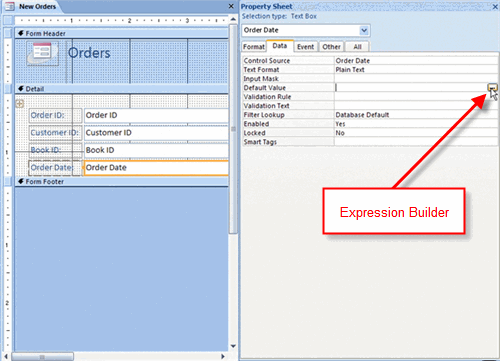
Open the Data tab on the field's Property Sheet.
Setting Order Date to Auto-fill with Current Date
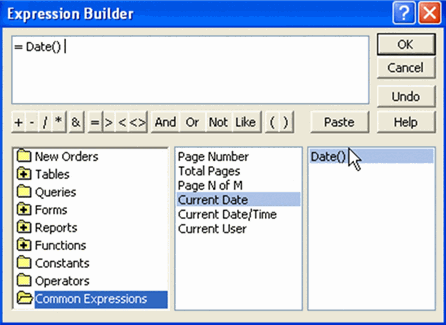
Set the Default Value property by clicking on the Expression Builder button.
Use Expression Builder to enter the expression for the current date. It looks like the image below.
Expression for Current Date
The Expression Builder contains many commonly used expressions for database functions. Explore them by clicking the various files in the lefthand column.
Creating command buttons
Another way to make a form more user friendly is by adding command buttons to the form. Command buttons are a quick way for form users to take a specific action. These command buttons are grouped into categories of actions, including:
Record Navigation command buttons, which easily allow users to move among the records in your database
Record Operation command buttons, which let users do things like save and print records
Form Operation command buttons, which let users quickly open or close a form, print the current form, and perform other actions
Report Operation command buttons, which offer users a quick way to do things such as preview or mail a report
To add a command button to a form:
Click the Button command in the Controls group on the Ribbon.
Button Command in Controls Group
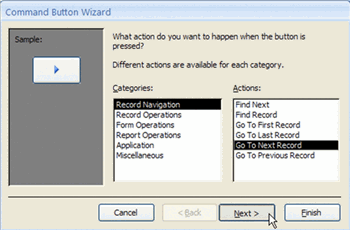
When the Command Button Wizard opens:
Select the type of command you want from the Categories list.
Select the specific action you want the command button to perform from the Actions list.
Click Next.
Command Button Wizard - Step 1
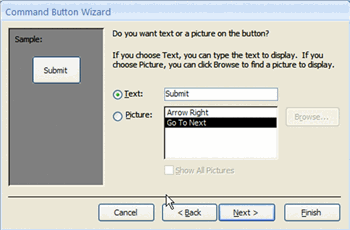
In the next wizard step:
If you want text to appear on the button, enter it in the Text box.
If you want a picture to appear on the button, select one using the Browse button.
Click Next.
Command Button Wizard - Step 2
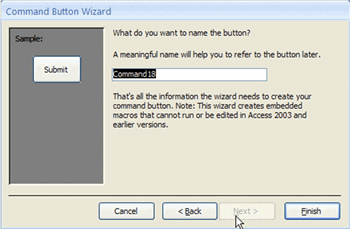
In the next wizard step:
Give the button a meaningful name. Note: Access will give your button a default name. Renaming it with a more useful name may help later if you have several buttons on a form and want to change the properties of one.
Command Button Wizard - Step 2
Click Finish.
The command button should be operational and appear on the form in Form view.
Open the Orders Form, and change the form properties so it limits users to adding records only.
Hide the Order ID and Order Date fields.
Set the Order Date field property to have a Default Value of the current date.
Create drop-down lists for the Customer ID and Book ID fields, making sure they contain helpful information for users and correctly populate the database with ID numbers.