Excel 2003: Enter, Edit, and Delete Data

Lesson 3: Enter, Edit, and Delete Data

/en/excel2003/create-open-and-save-workbooks/content/

Introduction

By the end of this lesson, you should be able to:

  • Enter text in a cell
  • Edit information in a cell
  • Delete information in a cell
  • Select multiple cells

Entering text in a cell

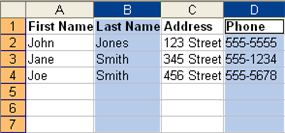
You can enter three types of data in a cell: text, numbers, and formulas. Text is any entry that is not a number or formula. Numbers are values that are used when making calculations. Formulas are mathematical calculations.

To enter data into a cell:

  • Click the cell where you want to type information.
  • Type the data. An insertion point appears in the cell as the data is typed.

    The Insertion Point
  • The data can be typed in either the cell or in the Formula bar.

    Text is Entered in Cell or Formula Bar
  • Data being typed appears in both the active cell and Formula bar.

    Text Appears in Cell and Formula Bar When Typed
  • Notice the Cancel and Enter buttons in the formula bar.

    The Excel 2003 Formula Bar
  • Click the Enter button Enter button to end the entry and turn off the Formula bar buttons.

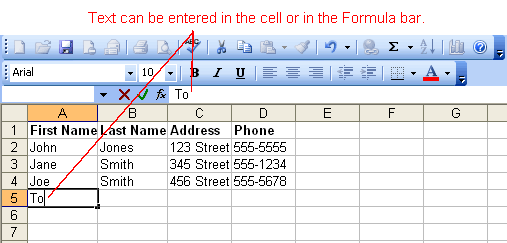
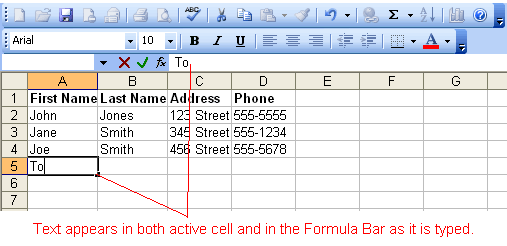
Excel's AutoComplete feature keeps track of previously entered text. If the first few characters you type in a cell match an existing entry in that column, Excel fills in the remaining characters for you.

Editing information in a cell

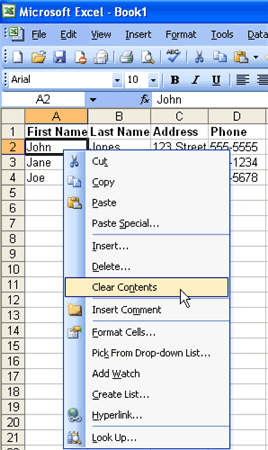
Information in a spreadsheet is likely to change over time. Information can be changed in the following ways.

Quick and easy method:

  • Click the cell that contains the information to be changed.
  • Type the new entry. The old entry is replaced by the new entry.

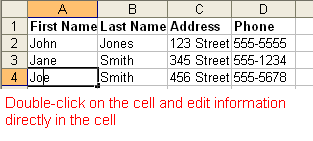
If the original entry is long and requires only a minor adjustment (in spelling, for example), then you can directly edit the information in the cell.

To edit information in a cell:

Method 1: Direct cell editing

  • Double-click the cell that contains the information to be changed.
  • The cell is opened for direct editing.

    Direct Cell Editing
  • Make the necessary corrections.
  • Press Enter, or click the Enter button on the Formula bar Enter button 
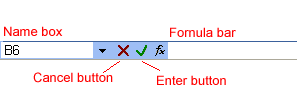
to complete the entry.

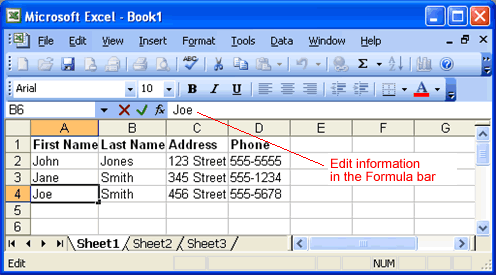
Method 2: Formula bar editing

  • Click the cell that contains the information to be changed.
  • Edit the entry in the Formula bar.

    Edit Information in the Formula Bar

Deleting information in a cell

To delete data that already appears in a cell:

  • Click the cell that contains the information to be deleted.
  • Press the Delete key, OR
  • Right-click and choose Clear Contents from the shortcut menu.

    Clear Contents selection on the Shortcut Menu

To delete data being typed but not yet added to the cell:

  • Cancel an entry by pressing the Escape key.

Performing Undo and Redo actions

Sometimes you might do something to a spreadsheet that you didn't mean to do, like type the wrong number in a cell. Excel 2003 allows you to undo an operation. Use the Undo button Undo button on the Standard toolbar to recover an error. The last single action is recoverable.

To undo recent actions (typing, formatting, etc.) one at a time:

  • Click the Undo button Undo button.

To undo several recent actions at once:

  • Click the arrow next to the Undo button.
  • Select the desired Undo operation(s) from the list.

    The Undo List Box
  • Microsoft Excel reverses the selected action and all actions that appear in the list above it.

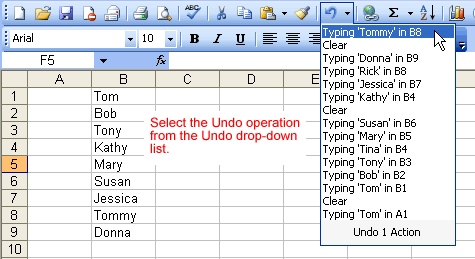
An Undo operation can be cancelled by applying a Redo. This is useful when an Undo operation was mistakenly applied. Remember, a Redo is possible only if you have not changed an Excel spreadsheet since the last Undo operation was completed:

To Redo an Undo operation:

  • Press the Redo button Redo button.

To Redo several recent Undo actions at once:

  • Click the arrow next to Redo button.
  • Select the desired Redo operation from the list.
  • Microsoft Excel reverses the Undo operation.

Selecting multiple cells

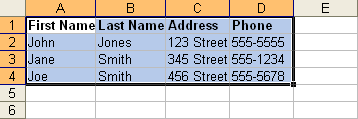
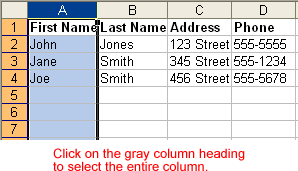
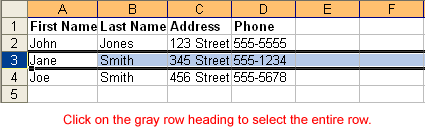
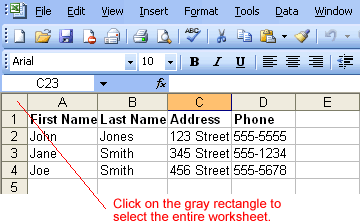
The currently selected cell in Excel is called the active cell. You can also select a group of adjacent cells, or a cell range. Many operations can be performed against a cell range, including moving, copying, deleting, and formatting. A cell range can be defined in different ways: Select a specific range of cells, select multiple columns or rows, or select the entire worksheet.

To select a range of cells:

  • Move to the first cell in the range.
  • The mouse pointer becomes a large cross.
  • Click and hold the left mouse button and drag left or right, up or down to the last cell you want to select.
  • Release the mouse button.
  • The cells you selected are shaded.

    Cell Range

To select all cells in a column or row:

  • Click the gray Column heading to select the entire column. (Click and drag the cursor across other column headings to select those columns.)

    Select All Cells in a Column
  • Click the gray Row heading to select the entire row. (Click and drag the cursor down through the row headings select those rows.)

    Select All Cells in a Row

To select the entire worksheet:

  • Click the gray rectangle in the upper-left corner to select entire worksheet.

    Select Entire Workbook

If the cells and columns you want to select are not directly next to one another, select one of the ranges you want to select and hold down the Control key while selecting other ranges.

Use Cntrl Key to Select Specific Columns, Rows, Cells

Challenge!

  • Open your Monthly Budget file.
  • Type the following data in the spreadsheet:
    • In cell A1, type Monthly Budget.
    • In cell A2, type Rent OR Mortgage.
    • In cell A3, type Car Payment.
    • In cell A4, type Cable.
    • In cell A5, type Power.
    • In cell A6, type Phone.
    • In cell A7, type Insurance.
    • In cell A8, type Credit Cards.
    • In cell A9, type Groceries.
    • In cell A10, type Gas.
  • Type your other monthly bills in Column A, cells A11-A14 (if you have any).
  • Type Total Monthly Expenses in cell A15.
  • Type Income in cell A16.
  • Type Savings in cell A17.Challenge 3
  • Save and close the Monthly Budget file.

/en/excel2003/moving-copying-and-deleting-cell-contents/content/