Excel 2003: Inserting and Deleting Cells

Lesson 11: Inserting and Deleting Cells

/en/excel2003/changing-column-width-and-row-height/content/

Introduction

By the end of this lesson, you should be able to:

  • Insert cells
  • Delete cells
  • Merge cells

Inserting a cell

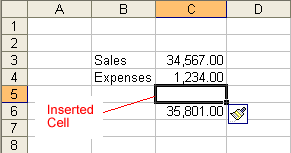
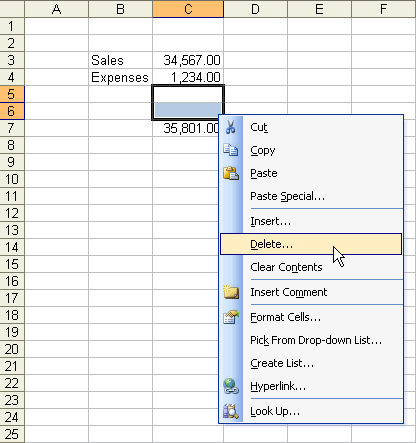
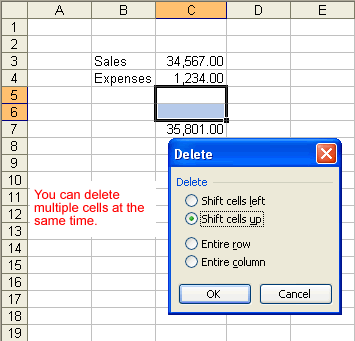
When working in an Excel 2003 worksheet, you may need to insert or delete cells without inserting or deleting entire rows or columns.

To insert cells:

  • Select the location where the new cell(s) should be inserted. It can be a single cell or a range of cells.
  • Right-click, and choose Insert.

    Note: You could also choose Insert Cell on the menu bar.

    Insert Selection on the Shortcut Menu
  • The Insert dialog box opens. Select either:
  • Shift cells right to shift cells in the same row to the right.
  • Shift cells down to shift selected cells and all cells in the column below it downward.

    Insert Dialog Box
  • Choose an option, and click the OK button.
  • Your result displays in the spreadsheet.

    Cell Inserted Into A Spreadsheet

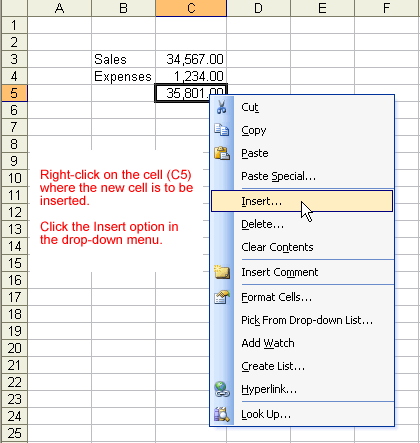
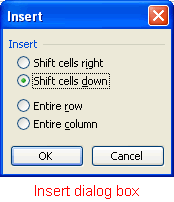
Remember, you can also use the Insert dialog box to insert or delete columns and rows.

Deleting a cell

To physically delete the cell from the spreadsheet:

  • Right-click and choose Delete.

    Delete Selection on the Shortcut Menu
  • The Delete dialog box opens. Select either:
  • Shift cells left to shift cells in the same row to the left.
  • Shift cells up to shift selected cells and all cells in the column above it upward.

    Delete Dialog Box
  • Choose an option, and click the OK button.
  • Your result displays in your spreadsheet.

Merging cells

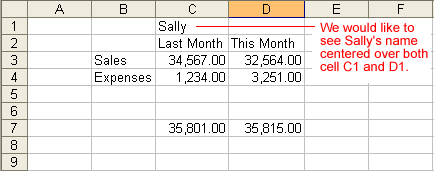
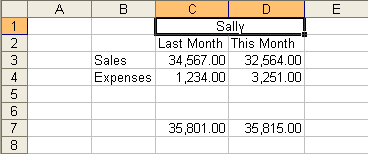
In Excel 2003, you have another alignment option available to you: Merge and Center. This is performed when you want to select one or more cells and merge them into a larger cell. The contents will be centered across the new merged cell.

The picture below shows why we might want to merge two cells. The spreadsheet presents Last Month and This Month Sales and Expenses for Sally. Notice that Sally's name appears above the Last Month column. To evenly center Sally's name across the two cells, we would perform a Merge and Center.

Header Label Before Merge Cell Operation

To merge two cells into one:

  • Select the cells that you want to merge. It can be cells in a column, row, or both columns and rows.
  • Click the Merge Button Merge and Center button on the Standard toolbar.

    Merge and Center Button on Toolbar
  • The two cells are now merged into one.

    Header Label After Merge Cell Operation

Challenge!

  • Open your Monthly Budget file.
  • Insert a blank row above the current row 1, which contains the months of the year.
  • Type My Budget in A1.
  • Use the merge and center function to center My Budget over columns A through N.Merge and Center Example
  • Save and close the document.

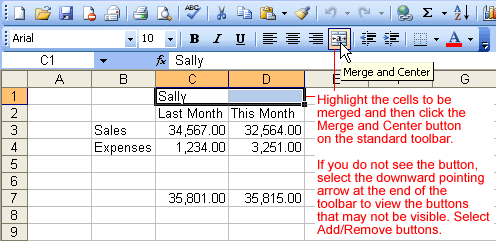
/en/excel2003/text-and-cell-alignments/content/