Lesson 2: Creating a Blank Presentation
/en/powerpoint2003/the-powerpoint-window/content/
Introduction
By the end of this lesson, you should be able to:
- Choose and apply a slide layout
- Add text to a placeholder
- Save and close a presentation
- Exit PowerPoint
Creating a blank presentation
PowerPoint offers three ways to create a presentation: Blank presentation, From Design Template, or From AutoContent Wizard.
The Blank presentation option is one of the more commonly used methods. It offers several blank slides, with layouts for text and graphics.
To create a blank presentation:
- Open PowerPoint.
- A slide featuring a place for a title and subtitle appears by default. You can start your presentation with this slide or choose a different slide layout.
- The New Presentation Pane appears on the right side of the screen.
- Under New, click Blank Presentation.
- A list appears.
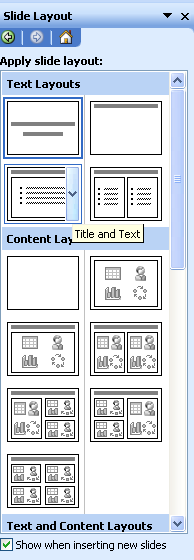
Choosing a slide layout
As you work on your presentation, think about the type of layout you want. Do you want a slide with text and lots of clip art, or one with text and a chart? PowerPoint offers several layout options.
To choose a slide layout:
- Move your arrow pointer over the layouts, or use the scroll bar in the Slide Layout pane.
- A gray bar appears to the right of each layout.
- When you find a layout you like, click the down-pointing arrow and choose Apply to Selected Slide.
 You can also click on the slide layout to apply it. Notice that the slide you are currently working on has a dark border in the Outline pane.
Placeholders
Once you choose a layout for your slides, you can begin adding text, graphics, and other elements. This is done with placeholders—special places within a slide where you can add content.
To add text to a placeholder:
- Click on the placeholder.
- Start typing.
You'll learn about inserting clip art and other graphics into placeholders later in this course.
Saving a presentation
You can save, close, and exit presentations in PowerPoint just as you would with other Microsoft applications.
To save a presentation:
- Click on File
 Save (Ctrl+S).
- Choose the location where you want to save your presentation. (My Documents is a good place).
- Type a name in the File Name box, or keep the one PowerPoint has provided.
Closing a presentation and exiting PowerPoint
Once you've finishing working on your presentation, you can quickly close it.
To close a presentation:
- Click the X in the PowerPoint presentation window (Ctrl+W).
- The PowerPoint application remains open, and you can start a new presentation. (See next page for details).
To exit PowerPoint:
- Click the X in the top-right corner.
OR
- Choose File Exit (Alt+F4).
Before you exit PowerPoint, make sure to save any work you want to keep.
Creating a new presentation using the traditional method
After you have closed one presentation, you can easily start a new one while PowerPoint is still open by using the traditional new file creation method.
To start a new presentation:
- Click FileNew (Ctrl+N).
- In the New Presentation pane, under New, choose Blank Presentation.

- Choose the design layout you want.
Remember, if your task pane disappears from the right side of the screen, click ViewTask Pane.
Challenge!
In this series of challenges, you will prepare a presentation about where you learn. This presentation can contain facts about the city or town where you learn and the place you use GCFLearnFree.org (home, library, learning center, Internet cafe, etc.).
- Start PowerPoint.
- Use the downward-pointing arrow beside Getting Started in the task pane to select New PresentationBlank Presentation.
- Choose a slide layout with a title and subtitle placeholder.
- Type Where I Learn in the title placeholder.
- Type your name or user name and today's date in the subtitle placeholder.For example:

- Save the document as Where I Learn.
- Exit PowerPoint.
Important reminder: If you are using a public computer—like one at a library or learning center—you may not be able to use the same computer each time. It is important to understand the policies on saving documents to public computers. Some places do not allow you to use floppy disks or USB flash drives due to the risk of computer viruses. Ask someone in charge of the public computers where you are. If you are unsure how you will keep a recent copy of your work, you can always email a copy of the document to yourself when you finish working on it.
/en/powerpoint2003/inserting-copying-and-deleting-slides/content/